December 19, 2010

Winter Reading

Just touching base so people know I'm not hibernating like my bees. I am still very much active in my beekeeping hobby.

Up until last week the winter we'd been having a fairly mild winter up here in Edmonton. Things took a change for the worse as we were hit with a foot of snow and some cooler temperatures. I was planning on checking in on the bees sometime this month but seeing as my car is having troubles getting around the city I hardly think country back roads would be kind to me.

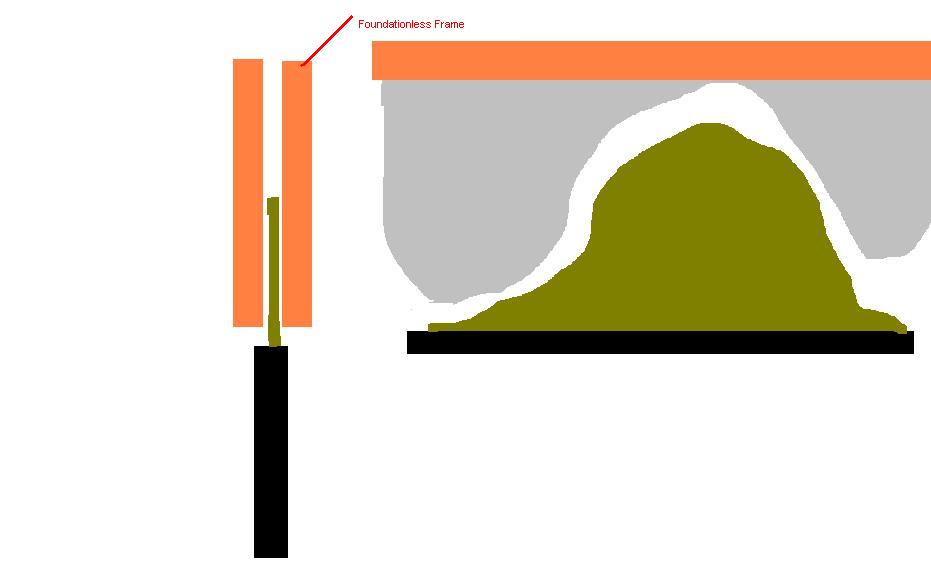
To pass the time I have been reading forums and checking out Phil Chandler's webpage. Phil specializes in top bar hives. A few months back Patty approached me about setting up a top bar workshop for everyone in Edmonton she could find that would be interested in starting some top bar hives. Top bar hives haven't really been used in North America since most commercial operations use Langstroth hives. With the increase focus on natural beekeeping many new beekeepers are looking at top bars as a way of bucking the trend, regardless of benefits or draw backs. Currently Eliese with ABC in Calgary has been really promoting the top bar hive and the response has been great. With beekeeping being "legal" in Calgary many beginner course has been selling out as people are drawn to this new hobby. Hopefully Patty and I can start getting things rolling here in Edmonton.


In November I received "Natural Beekeeping" by Ross Conrad from my in-laws for my birthday. I had heard about Ross while browsing around forums, so I had put the book on my list. After finally getting through it, I had only been reading it during my Saturday work shift, I am extremely glad to have done so. Ross is very straight forward to his ideas on organic beekeeping, while not being too pretentious or sounding too granola. He presents both sides of the story with pros and cons of both. His personal experimentation and trials are very well explained and illustrated. I would highly recommend this book to anyone considering trying to go organic or even just more nature friendly.

Along with preparation for a top bar hive workshop this winter I also still have to get around to making my beeswax lip balm. I'm such a procrastinator.

November 13, 2010

Winter Storage Issues

My lord it's been a long time since my last post. Things really do slow down for beekeeping with the onset of cooler weather. I hesitate to say winter yet because we here in Edmonton have been fortunate enough to not have any snow!

My bees have been nicely put to bed for winter. Mario had some extra winterization material so he graciously let me use it. Basically the hive is first wrapped in some roofing paper and a piece of 2" thick Styrofoam is placed on top. Then Mario has made some custom sheaths that provide a protective entrance that slips over the top of the hive. Once all of this is placed onto the hive it gets a final wrapping of bungee cord to ensure nothing blows away. Here is what the final winterized hive looks like:


Although there isn't much to do with the hive during winter there is plenty of other things to keep me busy. Some of the issues that beekeepers face during winter is storage of all the extra frames of wax and supers. Because I crushed and strained my frames of honey I'm glad that I don't have any extra wax frames. Large producers have to be concerned with pests that like to use these frames for food or nesting. Wax moths can make quick work of destroying nicely drawn frames. Ants are always a pest and I have even had to ward them off in my garage. I wasn't however prepared for mice. Mice like to make nests in stored supers and also in active hives. If you don't reduce the entrance of the hive mice will take advantage of the warmth generated by the bees. The bees are too concerned with keeping warm to chase the mice out, as the mice get comfortable they will start chewing up all the wax.

While organizing my equipment I found this


I would assume it was either trying to find some place to sleep or was trying to eat the spilt honey. Unfortunately I think it got entombed in the honey and subsequently died there. I will save everyone the tale of removing a soft squishy mouse encased in taffy like honey.....it wasn't pretty. I've since properly stored my equipment to hopefully avoid such death traps.

I'll try to update everyone with any interesting information about beekeeping throughout the winter.

October 9, 2010

Accidental Winner

Thanks everyone for your tireless photo scanning abilities as well as your multitude of guesses. So what was the magical winning number? It was 13 and a large number of people came very close to the answer. The one thing that people seemed to forget is that free loading men aren't exactly ones to follow orders. The thirteenth drone was this one stubborn guy who just had to get back into the hive, and he was furiously working on that goal. All you could really see is his very large thorax and abdomen. Here is a picture in which I have placed a red dot on each drone in the picture.


The winning guess was 13 actually done so in a humorous, non-serious manner saying there were 13 as proven by a submitted photo shopped picture but, unbeknownst to them, they were actually right. I'd like to congratulate Goran for his humorous, yet accurate guess. He will receive my last full mason jar of honey. Mmmmm mmmm good.

People are always curious as to how my bees are doing. I did a quick inspection on Thursday when the weather was nice and am happy to report that taking full advantage of my feeders and have filled the entire upper box with capped winter stores. It appears that they should have plenty of stores for winter. With the future forecast looking very good, I believe it will be a while before I actually get around to having to wrap my hive with roofing paper and putting some insulation on top. I also need to decide whether or not to move my hive into city limits.

October 6, 2010

Last Guessing Day

Just a shout out to all those looking to win my last jar of free honey. You have one more day to submit your guess. I will close the polls at 8PM MST. Enter in any of the comment sections of the last 3 posts or email me at newbees@telus.net

September 29, 2010

Hints and Deadline

OK, so I've already gotten a few guess for my last jar of honey. It appears it's a bit easier for me than for someone who hasn't had any sort of beekeeping experience. So I'll clear the guessing slate because the first few where on the high side and I'll provide a few hints to help people improve their drone hunting. Also when I clicked on the picture to make it larger it wasn't as large as the original file so I'll provide a link to my full size picture. That will allow all you guessers a chance to zoom in and look for the details. Onto the hints!

1) As already stated, drones have large fly like eyes. They cover almost their entire head.

2) Also stated was that drones have very large bums that are squared off. This means they are quite a bit larger than worker bees.

3) One can than assume that because they have bigger bodies, they have bigger wings.

4) Drones make up a small portion of the hive population, around 11%.

5) Because they are being forced out, they aren't allowed near the entrance to the hive.

Hopefully that will be enough to help all you out. Below is the link to the full size picture, remember to make the picture bigger if Windows automatically reduces it to fit in your browser window.

FULL SIZE PICTURE

The deadline for the contest will be Thursday October 8th, make sure to get your guess in before then!

September 28, 2010

Acclimation

I'm a bad blogger. Either that or I've become use to being stung, I believe it's the later. I bring this up because I have totally forgotten to update my sting counter to 4. It happened back when my parents were out and we were harvesting my 2 frames of honey. After I had completed everything I was standing around waiting as my Dad discussed beekeeping with Mario, apparently one of my girls had gotten up my pant leg and gave up trying to find a way out. She stung me on my calf much to my surprise, and the irony lies in the fact that I had specifically changed out of my shorts and into pants for harvesting because I thought it would be better. Had I stuck with my shorts I most likely would have been fine.

Yesterday I went out to setup my fall feeder. It's a really simple setup, much like a hamster water bottle. You fill up a 2L jar or ice cream pail, punch a few holes in the lid, then invert it. Eventually the vacuum that forms because of the air pocket will keep the syrup from completely flowing out and the bees can then take it at their leisure. The syrup that drips out during the process also lets the bees know there is a food supply nearby. Around the feeder you put an empty super and seal it off, this prevents bees from other hives from coming and robbing the feeder. In really bad situations, after they are done with the feeder they will start stealing honey stores if the hive is too weak to defend itself.

I'm getting more comfortable with my bees so I'm working without gear.


How the feeder is setup inside.


The third super provides the empty sheltered space for the feeder.

This is also the most satisfying time of year for all the female beekeepers out there. As my readers know, all the worker bees are female and do all the work in the hive. All the drones are male and do absolutely nothing in the hive except go out to mate. If they aren't out flying they're getting fed and groomed by the workers. As winter approaches though winter supplies becomes an issue and having a bunch of freeloaders hanging around doesn't help. There's only one solution, the freeloaders have to go except they don't really want to. This leads to the worker bees literally dragging and attacking drones out of the hive. The front entrance of my hive was full of drones trying to get back inside.

You can handle drones because they don't have a stinger. You can identify drones by their very large, fly like, eyes. They also have a very blocky abdomen with a squared off bum.

Now that you know what a drone looks like it's CONTEST TIME! I have one mason jar of honey left and due to my small harvest I don't have enough for everyone who wants some. So if you want a shot at my last jar you need to tell me how many drones are in the picture below. (The picture below is a full resolution shot, so it may take time to load the larger version when you click on it.) You can submit your guess in the comments below or by emailing newbees@telus.net

September 24, 2010

Three's A Crowd

Hello Everyone!

So I've been agonizing over what to do with the third super still on my hive. The problem is that the bees have only really drawn out a few frames and of those frames the honey is only about 50% capped. With the chilly weather starting to move in I really wanted to get it off, so yesterday I went out and took it off. I tried using a method where you take the box off and lay it perpendicular on top of the hive. If you do this after all the scout bees have gone home for the night it won't cause other bees to come steal the honey and nectar in the box. After a few hours of sitting there the bees that are in the box realize that something isn't quite right and will migrate back into the hive. Well when I went back Mario had decided to speed up the process and brushed the bees onto a wooden ramp he had set up leading towards the entrance. I arrived at about 9:30pm it was pretty chilly out and the bees had started to cluster up to keep warm, the only problem was they weren't anywhere near the entrance, so I took a stick and brushed them on top of the entrance. I hope they managed to find their way back in.

This is what it would look like, but without the use of a bee blower. You naturally let them go back in the hive.

When I got home I decided to see if I could scrap off only the capped honey into my straining rig, all of the rest I put into a separate bucket to feed back to the bees later. It seemed to have gone well, but when the honey filtered through by the next morning I was a bit concerned. Apparently I didn't do a good enough job at scraping because this honey was extremely thin. I also think that since Mario had started his fall feeding for the past few days there was a lot of sugar syrup rather than nectar. Rather than distributing thin and artificially sweetened honey I went ahead and added the bee feed to the straining rig as well. Once it's all strained through I will put it in some smaller buckets and take them out to feed back to the bees. (pictures to come)

September 21, 2010

Harvest Followup

I had the happy privilege of dropping off my first official jar of honey harvest to the winner of my previous contest. In case you don't recall I promised a jar of honey to the first person who could correctly find the bee in a picture of my hive when it was still in my backyard. The winner was really excited about her prize.

I waited a few more days to let the rest of the honey drip out and more importantly to let any rogue wax bits or other debris float to the top. After it appeared to have settled I went about doing some rough calculations to find out how many jars I would need. Turns out I had about 2 liters of honey. I started about filling my jars up, but once again my homemade valve made this process excruciatingly long. Eventually I managed to fill them all up, after which I'd let them sit a few days and then skim off any debris that made it into the jars and here's what I was ended up with.


Now that I had honey I need to decide what to do with it and sticking with my original plan I decided to make some Baklava, one of my favorite desserts. I stuck with the recipe of my favorite TV chef Alton Brown. It wasn't as hard or labour intensive as I thought it would be, however in future I might boil the syrup less to give it a slightly more liquid consistency. After a night of baking, I let it sit for a night to let all the syrup soak in. The next morning I had a piece, and in all honesty, I wasn't really impressed. However, it seems to get better with age as later in the week I was addicted and would recommend the recipe to anyone else who's a Baklava fan.


As for the bees I'm sure they've had a tough week, the weather has been really crappy of late. The nights have been dropping below zero and the daily highs have been single digits. The forecast for this week is looking better, double digit highs, so I plan to start getting all my winter prep done. This includes moving the hive to the acreage within city limits. I'll be sure to post about the move as soon as possible.

September 14, 2010

Crush and Strain

The weather finally decided to cooperate on Saturday which allowed me to head out the bee yard to harvest some of my honey. My parents were in town from Calgary so they joined me. When we got out to the acreage Mario was already suited up doing his own harvesting. Working as quickly as I could I picked out the best looking frames to harvest, and I was only able to harvest 2 frames. When taking frames for harvest you want to look for ones that are at least 80% capped, any less and the percentage of water in your honey will go up. Honey is around 18% water, but if you harvest too much uncapped honey that hasn't been concentrated it will raise the water content which can cause the honey to ferment.


Once home we started the process of getting our honey out. Being that extractors are expensive and I don't know anyone nearby that I could borrow one from, I have to use the crush and strain method. I felt bad doing this because it destroys the drawn comb, next year I will have to find/buy an extractor to avoid this. I started by using a plastic window scraper to get all the comb into the top bucket. This bucket had a bunch of holes drilled into it to allow the liquid honey to flow into the bucket below. Once both frames were scraped I finished crushing the honey with a angle scraper on a pole. I then added a few layers of cheese cloth between the buckets to catch any wax that may slip through the holes. After that it was time to play the waiting game.


Two days later the honey had all drained into the lower bucket. On this bucket I added a PVC spout I made from some stuff I picked up from the Home Depot. Normally you would add a honey gate onto the bucket, but the ones at the local bee store were $25. I built mine for $4.50, however I would soon learn there is a reason why you use a honey gate. Thinking that I would have more honey to harvest I picked up some 500ml canning jars, with only 2 frames worth of honey I would only fill 2-3 jars. All of my friends are quite excited about my honey so I need to go pick up some 250ml jars so I can spread the wealth. I did happen to have 1 jar in the cupboard so I cleaned it out and started to fill it up, which took a reaaaaaally long time. You see the cheaper alternative valve I put on my bucket was only 1/2" wide which didn't allow a large flow, the honey gates you get from the bee stores are 2" wide making them quicker and cleaner. Lesson learned.


My honey looked beautiful. It is very light in colour and has a very mellow taste. I'm not an expert in honey but I imagine it's mostly Alfalfa and clover. Now I just need to get started on making some Baklava.

September 10, 2010

To bee, or not to bee:

That is the question:
Whether 'tis nobler in the mind to suffer
The stings and arrows of honey fortune,
Or to take arms against a sea of troubles,
And by opposing end them?

So after I said I would harvest some honey this week the weather decided it was going to be miserable. This puts me in a dilemma, do I got ahead regardless of weather or wait for a nice sunny day.

On one hand, I'd really like to have some honey for my party. I planned on using it to make some baklava and honey mustard sauce, I could also have some small jars to give friends. However, when I started beekeeping I did so with the mind set that I would be different than commercial beekeepers. Because for commercial beekeeping it's all about making money and they treat their bees like garbage, harvesting regardless of weather. Sure they "care" about them because without them they wouldn't make money, but they don't respect them. No matter how innocent I think popping the top of the hive in cold rainy weather only for a few minutes to grab a frame or two it isn't good for the bees, or at least I don't think it's good for the bees. It also makes things more complicated because during bad weather the foraging bees aren't out in the fields so that means a lot more bees inside the hive.

It is the exact thing I'm trying to avoid; taking advantage of my bees. This sort of practice has to stop if we don't want our bees to die off, but it's up the individual beekeeper and I have chosen to side with my bees. I'm not by any means granola or hippy, but like any family pet I just want the best for my bees.

That said, I'll wait for the weather to change so I can go harvest some honey. I hope my party guests will understand.

September 8, 2010

And now for something completely different...

In the famous words of John Cleese I am straying from the path of beekeeping to focus on something completely different. What's so important to put beekeeping on the back burner you say? Food, glorious food.

You see, in complete honesty, if I was a woman I would want to have Alton Brown's baby or at the absolute minimum be married to him. For those who don't know who Alton Brown is, he is a Food Network chef who's television series "Good Eats" watches more like a Bill Nye: The Science Guy episode than a cooking show. On one hand he is a great cook and on the other a nerdy science geek, the combination of these two traits leads to a cooking show that explains why we do the things we do when cooking. As a slightly mad genius he is always coming up with basic, and cheap, alternatives that still adhere with what chemically needs to happening in cooking. This weekend I will be testing out one of his creations: the ceramic smoker.

BBQ, true BBQ unlike grilling that most people incorrectly think of as BBQ, is the low and slow cooking of tough meat with smoke to make it finger licking good. You can go out and purchase a smoker at a store for a few hundred dollars or you can follow these simple steps to create your own for under $100. According to my idol this cheaper alternative will do exactly the same job as one of those fancy $500 smokers. I have to decided to take up the challenge and will be the judge of this. In fairness everything else I've done under his tutelage has been true, so don't bet against me.

The Materials:

2 16" Terracotta flower pots - $45
3 Terracotta feet - $5
1 Hot Plate - $20
1 Heavy stainless steel pie plate -$4
1 14" Cooking grate - $14
1 Grilling/Candy Thermometer - $5

The premise is quite simple. Using two flower pots you create a thermally stable chamber which within you place your hot plate, the circular cooking grate rests above on it's own weight. Placing the wood chips in the pie plate creates the smoke as well as provides heat. The drainage holes in the flower pots provide a place to run the hot plate power cord at the bottom and to place to rest a thermometer on top.


Obtaining the materials was super easy, any large garden center (i.e. Home Depot/Rona) will have large terracotta pots. The largest at Home Depot was 20" however it was double the price of the 16", so in keeping with the cheap theme I got the 16" instead. The 14" cooking grate I got from my local BBQ store, it is a replacement grate for the 14" Weber Smokey Joe. The rest of the materials were purchased at Wal-Mart, does everyone else feel as guilty as I do purchasing all my cheap goods there?

Construction should also be as easy, however I managed to purchase a hot plate that was too big to fit in the bottom of my pot. It required a little McGyvering but I managed to take it all apart and get it threaded through the drainage hole to work, here's hoping I never have to BBQ in the rain. Once the hot plate was in it was just a matter of putting the pie plate on top, then the grate, then inverting the second flower pot.


Even after removing excess junk, the hot plate is still a tight fit.


I rigged the thermostat in a tuna can to keep it from causing any shorting issues.

Voila! A cheap smoker. I will let everyone know how it works, but I imagine I will be having all sorts of fun with it in the future; ribs, brisket, tenderloin, fish...the options are limitless.

September 6, 2010

HONEY!

Today Mother Nature once again spat in the face of the local weather forecaster. The predicted cloudy with rain forecast gave way to a beautiful sunny day and I have been itching to get out to check on the bees. There have been a few days in the past week with single digit lows so I've been curious as to how the bees have been doing.

We arrived at the bee yard at around 2pm with a temperature of around 18°C. The bee hive was as I have never seen it before, I wish I would have remembered to bring my camera. I'm not sure if it's because today was the nicest day it has been in a few days but there was tonnes of activity and a whole group of bees hanging out around the front entrance. Normally bees "beard" because of high temperatures during extremely hot days or because of space issues. I wouldn't really call today bearding, but it was pretty close. This is what a true beard looks like.


I wasn't quite expecting this amount of activity and all I was planning on doing was quickly adding an entrance reducer and taking a quick look up top. That was why I decided to wear shorts today, but I haven't had any issues in past and my bees really are very nice to work with so I decided to go ahead and do my thing.

Based on the amount of bees coming and going I decided not to add the entrance reducer, so I lit up the smoker and popped off the top. About 4 of the 10 frames on top were more than 90% capped honey, with 4 others being worked on and 2 completely untouched. I decided to rearrange the untouched frames into the middle of the box hoping the bees will start working on them and surrounded them by fully capped frames for further encouragement. Once that was done, I quickly took a look a the middle frame in the box below and saw numerous amounts of fresh eggs in a nice laying pattern so I know the queen is still doing her thing, and doing it well.

After a quick talk with Mario about what to expect for honey production and fall prep, I was pleased to find out that I should be able to harvest some of the frames that are fully capped. While 4 frames doesn't seem like much they are about 5-7lbs of honey each, so I should be getting around 20lbs of honey. I wasn't exactly prepared to harvest honey , so I need to start collecting materials. Initially I planned on doing it next week but we have a large deck party coming up this Saturday so I just might get some honey for some Baklava and maybe even a honey based BBQ sauce for the 12 hour smoked pulled pork I'm cooking up. Yummy! I'll be sure to take lots of pictures of my honey extraction process.

September 4, 2010

Essentially Screwed

It appears from the reader comments that making some chap stick from my newly rendered beeswax is a popular choice. I figured it would be a good thing to learn how to do because it would be one more thing I could sell at a farmer's market stand along with my honey.

I set out to find the ingredients required, some are pretty easy to find yet others seemed a bit more difficult. I have been looking around for some essential oils for the past few weeks. The only catch is that I want to use some of them for organic treatment of my bees, so they have to be pure/food grade/pharmaceutical grade. I did a brief search on the Internet but eventually decided to go with LorAnn Oils that Craig, the Southern Maryland Beekeeper, recommended on his site. Their prices seemed really reasonable, even after I factored in shipping...however I forgot to factor in UPS.

The day after I phoned my order in I received a call back from UPS, they wanted to clarify my COD charges. That's right, I foolishly forgot about UPS's infamous "brokerage" fees or to be completely frank their "you already paid for shipping, but we want more money out of you" fees. I've always disliked UPS and during that awesome period of time when the Canadian dollar was worth more than the American green back I did a lot of online shopping. If you can ship through United States Postal Service no matter what, that way you only pay the duty and tax. However, if you do have to ship through FedEx or UPS I just learnt something very useful.

I'm my pure hatred of UPS I started googling brokerage fees and came across a forum that was discussing this. One of the posters really seemed to know his stuff and posted that most of what UPS tells it's customers is a lie. Basically UPS will tell you that only they can declare your package and pay for the duties and taxes and that this must be done at the port of entry your package comes through, it's this process that requires them to charge you a fee for acting on your behalf. Interestingly enough though the Courier Low Value Shipping program allows anyone to do this. This is all laid out in the Canadian Border Services Agency's document D-17-4-0. Anyone can declare the contents of their package and pay for the duties/taxes at any customs office. So next time if that thing you have to have can only be shipped via UPS or FedEx, feel free to contact me and I'll fill you in on the details or from what I hear if you phone up and yell at the person on the other end of the phone they will most often give you a "one time" exception.

It's too late for myself as I gave them my credit card information when they called before I found out about this. All the stuff I need is on it's way so I need people to vote on what oil I should use for my first batch. You have the choices of the following, vote below in the comments; Lemongrass, Spearmint, Lemon, Eucalyptus.

August 25, 2010

Liquid Gold

Success!

Being that I have this week off I am running out of things to do, besides the finishing touches on my deck. I did a little bit of work on it today, honest! I decided to finish processing my beeswax. Yesterday I had gotten it into a semi refined state, but it still had a large portion of debris in it though. Today I would use my wife's beat up old panty hose to finish the job.

I started by taking my wax disc and putting in in a pot with a large portion of water. I brought the mixture to a boil and as it was coming to a boil I set up my filtering apparatus. It was very fancy.


As soon as the wax started to boil I began to pour it through the filter. As the first bit of liquid hit my trampoline tight panty hose it decided to take a flying bum drop leap onto the kitchen floor, oddly enough it was at this exact moment that I remembered a quote from the website in which I took this filtering method from. "I do this outside. Wax is also a bear to get off of your kitchen floor and it's not something you can easily hide from your husband/wife."


No real harm done, just 10 minutes of scraping wax off the floor with a old plastic gift card. As an added bonus that section of the floor is now nicely smooth and waxed. I removed the panty hose containing what is known as "slumgum" and tossed it into the garbage, although I hear if you spread it out on some newspaper and let it dry it makes a great fire starting material.


Below lay a cloudy miso soup type liquid that I placed in the garage to harden.


A few hours later I retrieved it and was astounded by the purity, liquid gold indeed. Now I'm not entirely sure what decides how dark wax will be, if it's related to the species of bee or the age of the wax but my disc is a brilliant yellow.


I haven't decided what I'm going to do with this wax yet, it seems almost a shame to use it on my wooden frames because of the effort I went through to filter it. I have found a lip balm recipe though, so I may give that a try.

August 24, 2010

Close but no cigar

Yesterday you read about my attempted exploit into refining wax. I left the pot out in the garage to cool overnight and when I went this morning this is what I found.


It was a nice solid disc of wax but there seemed to be some debris causing discoloured veins. After I removed it from the pot it was apparent there was still a lot of debris on the bottom.


I have scrapped this off into the garbage but there are still a few large objects embedded in the wax. I have purchased a second pot from Goodwill so I will melt it down and strain it. I'll post pictures of that when I get around to it.

August 23, 2010

My troubles with wax

Greetings once again readers. Forgive me for the long period since the last post, I have been busy building our new deck after my weeks of backyard preparation.

The weather for the past few weeks has been pretty lousy and the forecast for the upcoming weeks isn't looking to great either. It seems that fall is finally upon us, barring any freak heat waves. I did do a quick check-in on the bees last week to see how they were managing. I'm happy to say they've started working on filling the 3rd box with honey but I don't think there will be enough nectar to finish the job. There aren't any major flowering crops at this time so they'll only be foraging on what little blooming plants they can find. I'll have to start feeding them so they can build up enough stores for winter. The forecast is looking good for tomorrow so I'll be heading out to do a full inspection to make sure they are free of disease and pests. The last thing you need is a hive weakened by those issues going into winter.

Today I decided to try and get my two buckets of burr comb refined down into some liquid gold. I'm not sure how much I'll get, but I need to free my buckets up so I can use them to collect more burr comb in the future. Having talked to my instructor from the beekeeping course on various ways in how to go about melting the wax, I started off by getting all the comb into my pot in a double boiler setup.


This appeared to be going well, but there wasn't enough heat to completely melt all the wax, it was hardening up on the last piece of comb I put in the pot forming a wax ice burg. All other sources I've read said you need to get a water and wax mixture boiling so I threw out the double boiler idea and put the pot directly on the stove and added some of the boiling water.


As soon as it began boiling I realized that I had an issue. I don't have any other metal vessels into which I can strain the large debris out of the wax, oh sure, I could have used one of our nice cooking pots but not if I wanted to sleep in a cozy bed tonight.

I've decided I'll just put the mixture out in my garage for the night to see how well it separates and hardens on it's own. I may have to melt it down again to strain it but I don't have any plans on using it for candles or beauty products so if it's not 100% clean it's not a big deal. I'll post a picture tomorrow of how well the separation went. In the mean time I'm off to the Good Will store to see if I can get some cheap metal vessels.

August 11, 2010

Everyone Needs Their Own Space

So there was a very cool observation during my last inspection and a great learning experience. As I was inspecting the middle box I noticed that a foundationless frame I had pulled out was not completely drawn out. It looked a little something like this, forgive me for my lack of MS Paint skills.

My first thought was that it was normal, the bees just hadn't gotten around to drawing the comb all the way down to fill out the entire frame. However, while I was sliding it back into the box I noticed a very large piece of burr comb on the frame behind. It appeared to be drawn onto the outer frame and I was frustrated because I thought I had fixed this problem by adding a 10th frame. Upon closer inspection thought it was actually drawn upwards from the top of the frame below, and the outer frame was just fine. After some cursing I realized I would have to remove the middle box in order to cut this comb out. It was either that or somehow reach my hand down in between frames. I wasn't planning on getting that far down into the hive, but it had to be done. So why did they create this comb?

I am quickly learning about the importance of "bee space". This is what Lorenzo Langstroth discovered in 1852, the space in which two bees can move past each other back to back, 1cm. This is the space between two drawn frames of comb, any more space results in burr comb as the bees try to ensure this bee space. The problem of foundationless frames is that they don't really offer any sort of guide for the bees leaving them to their own devices, resulting in some very unexpected architecture. Because I had failed to properly line up the frames from box to box, the bees fixed the bee space on their own. There are actually frame spacers you can buy that will ensure the frames between boxes line up vertically and I am starting to wonder if I should have invested in some of these.

As you can see, the foundationless frame allowed open space for the bees to build comb both up from the frame below and down from the paint stick guide on the upper frame. Because these didn't actually line up at the point in which they would have joined it caused both to stop. The top frame looks incomplete because the large shark fin shape comb filled the rest of the space below.

All in all a new lesson learned and something to keep in mind when I add new boxes, maybe I will even purchase a few frame spacers to add next season.

August 9, 2010

Busy as a...well, you know

Man have I been a busy boy for the past week or so. I've been trying to get our backyard ready for some deck construction this upcoming weekend so I haven't had much free time to blog.

A few days ago I headed out to the hive to do a quick inspection to see if the frame feeder was empty and to check on the progress of the 3rd super I added. The feeder was bone dry so I removed it, however the bees hadn't made any progress on drawing comb on any of the frames. Being that I wasn't doing a real inspection I figured I'd save deeper analysis for later.

Today was a gorgeous day, hot and sunny without a trace of wind. I packed up all my gear and headed out to see how the bees were doing. Activity around the hive was looking good, I always take time each visit to watch the bees behaviour coming and going from the hive. A lot of beekeepers will tell you that you can always tell if there are any issues in the hive by what is going on at the front entrance. My girls looked just fine, in fact they're working hard to keep the house cool. Bees regulate the temperature in the hive all by themselves. If it's too cold they will huddle together and vibrate their flight muscles to generate heat and if it's too hot they will use their wings to force air through the hive. Here you can see the bees lined up in a row fanning their little wings to keep the air flowing, it was the same up at the top entrance with the exception that the bees were facing the other way. Blow air in one entrance, suck it out the other. Smart creatures indeed.


Fanning air out of the bottom entrance.


Fanning air into the top entrance.

The bees had started drawing comb on the new frames, there were even a flew places where the honey was capped. Once the bees have gathered enough nectar they will use their wings to fan the nectar so that it loses moisture and when it finally reaches the proper viscosity they will cover the cell with wax. When I moved into the box below I was extremely happy to see that the outer most frame was completely capped with honey, there was a small patch of pollen at the bottom but mostly honey. Bees always build their nests in a ball shaped pattern, the core of the ball is where they raise brood and as you move towards the edge they store pollen and then finally honey. The outer most frames are usually solid honey. This layer of honey also serves as insulation in order to keep the brood nest at the correct temperature to raise young.


Outer frame fully honey, and a small bit of pollen at the bottom.

As I moved towards the center of the box I found solid capped brood that was topped by capped honey. In the picture below you can get a sense of how the ball shape forms. The top of the frame is covered in capped honey, and as you move down you see the different shades of yellow pollen, finally the capped brood goes to the very bottom. If you imagine this as the upper cross section, the capped brood would continue on the frame below in the lowest box. The laying pattern of this queen isn't stellar as there are a few missed cells with no capped brood. Overall not a great concern because a higher percentage of the cells did have eggs laid in them.


A visual cross section of the "brood ball".

I was very tempted to take one of the outer frames of honey to come home with, but I decided against it. The bees are doing a fine job and I imagine they will probably be able to fill up the top box with honey by the end of August. I was speaking with Mario and his neighbour to the south has an Alfalfa field. Alfalfa has two blooming periods because it grows so well and gets cut down after the first bloom. Turns out the second bloom will be starting within the week. With any luck my bees will be working their little hearts out to gather some stores for winter and maybe, just maybe, some excess I can keep for myself. I really don't want to steal everything because I think it's best for bees to eat honey over winter as apposed to sugar water feed. As I read on the bee forums, "Until you have a colony of bees survive it's first winter you are a bee haver, not a beekeeper." Here's hoping.

August 3, 2010

The Lazy Man's Hobby

Beekeeping has often been quoted as "The Lazy Man's Hobby" and it's really quite true. If you only have a few hives and you take a minimalistic/organic approach there really isn't a whole lot for you to do. You simply check the hive every 10 days or so to make sure the bees aren't having any issues with disease or space constraints. There is much more work to be done during fall and spring than winter and summer, but most of the time you are just leaving the bees alone. This leaves a lot of downtime that needs to be filled.

I've spend my time reading the bee source forums, a great resource to all things beekeeping. Any question you may have will quickly be answered by beekeepers all over the country and there are countless threads in which you can just read to learn more about bees. I've added the link on my side bar if you wanted to check it out!

I've also been thinking about what I can do to promote urban beekeeping here in Edmonton. I haven't really heard much from the city developers my counsellor got me in touch with other than "we're looking into it." While my original train of thought was to try to get beekeeping legalized, which will eventually happen judging from other cities around the world, I have thought of a great plan to get bees into the city that avoids the NIMBY (Not In My Back Yard). I would call it "Buzzing With Business" and it would be a program that would allow local business with accessible flat rooftops to have a hive. My main issue is that I would still need to get the city on board to provide permissions because quite frankly it would be hard to get businesses on board if it was illegal for them. If enough business signed up it would allow for training of people who wanted to learn about beekeeping as I wouldn't be able to manage all the hives. The best part is the hives would be out of site and out of site = out of mind. After a couple of years pass without incident it would provide valuable evidence to the city for legalizing beekeeping.

As for my other projects I'm still really keen on getting some Newbee TV episodes filmed and edited. I would love some input from my readers though! I need episode ideas and as it will be focused towards new beekeepers/people who want to become beekeepers, what sort of things would you like me to cover? Post below in the comments!

I will be heading out to the hive tomorrow if the weather is nice, I'll post up with some pictures so everyone can know how my bees are doing!

July 27, 2010

Summer Lovin'

Wow! What great weather we have been having for the past week or so. Granted there was some pretty hefty rain that came and went, but as of late it's been sunny or sunny with cloudy periods. I can honesty say I was a bit worried because I feed my bees with the notion that it would be lousy out, not sunny, so I didn't know what to expect when on this inspection. Would they have ignored my feed with such great weather allowing for nectar collection?

I'm a little ahead of my proposed inspection schedule, but with today being such a glorious day with the hot sun and lack of wind I just had to go out. With all this great bee weather I decided to pack up an extra super along with 10 Mann Lake frames just in case the bees happened to doing extremely well. When I arrived at the hive things were definitely looking good, my hopes and expectations immediately rose as this is what I saw.


The entrance was busier than I have ever seen it before. Lots of bees guarding the entrance and even more coming and going. I quickly suited up and got my smoker going. I was going to try working without a veil today, but I'm still a bit nervous about that prospect and I think my nerves were strained when I saw all the activity at the front. I did work again without gloves though, that sting last week hasn't deterred me and my finger is back to normal size. Most people are very concerned with the swelling of a bee sting even though it is the bodies normal reaction to the foreign proteins. Everyone is technically allergic, however a small population is extremely allergic where the reaction spreads beyond the local area. Given a few days the swelling will go down and all is well.

I popped the top off and was happy to see the bees were "all up on" my frame feeder, I guess they had no issues with the help I was offering. The feeder was only about half empty so judging from what I have read on some bee forums they aren't using it at a crazy rate, I was expecting it to be empty after a week.


I removed the feeder and instantly had a problem...I didn't have anywhere to put it. I couldn't prop it up against the hive like I do with my other frames because the syrup would run all over the place. I reluctantly placed it on the ground and in the process squished a whole lot of bees. Not to sound like a bleeding heart because a lot of bees do die during an inspection, however I can't help but feel guilty for the ones that I could have prevented with better planning. Feel free to avert your eyes from the carnage below.


(I apologize for the lack of focus, but those fuzzy blobs are dead bees)

After a quick prayer for the deceased I started inspecting the frames on the top super. Every single one of them was drawn out! It's incredible, my bees are doing fantastic. A closer look using the sun behind my back showed hundreds, more like thousands, of eggs in the newly drawn comb on multiple frames, this is going to be one strong hive once they all hatch into bees in about 3 weeks. I am delighted that I decided to bring my 3rd deep super because this hive was ready for it. I scraped some of the burr comb off the top of the frames to make room for the lid and to my delight some of that burr comb happened to be capped honey, I set that aside for later. I added my 3rd super and voila! Inspection done. Isn't it a wonderful sight!


Oh, as for that burr honey I collected, I ate it when I got home(wax and all). So delicious! Literally, to get any fresher the bees would have to deposit the nectar in your mouth, fan it and cap it. I am really hoping my hive is strong enough to produce enough honey stores for winter so that I can take just a bit for myself.

July 20, 2010

Feeding the Bees

I apologize for any crazy typos during this post. I was working gloveless today and happened to make the mistake of pinning a bee against the frame, now my right pointer finger is about twice it's normal size. I was in the process of trying to flip a frame around so my wife could take a picture of some odd looking comb. The worse part was that I was holding the frame and didn't have enough hands to remove the stinger meaning more and more venom was still being pumped in. I put the frame back in and used my hive tool to scrape it off, but enough about my stupidity, on with the post.

Lately I've been a bit concerned with how my bees are progressing. They appear to be building their numbers sufficiently, but they aren't really drawing out new comb. The 4 middle frames in each super are fully drawn out with nice brood patterns, but keep in mind 5 of those came with the nuc already drawn out. However, the other frames they aren't really taking too. They have drawn some nice beautiful comb on a few of the foundationless frames, but this was after I moved them into the middle of the brood frames. I think that will be the key to getting all the frames drawn out will be to slowly start rotating empty frames into the middle of the brood chamber so they draw them out, I can't do this too quickly though because you don't want to separate the brood by more than 1 empty frame. Some beekeepers are using 8 frame boxes because they find the bees really don't like drawing comb on the outer frames of a 10 frame box, however it's too late for that because I've already purchased all 10 frame supers.

In an attempt to help the bees along I have decided to mix up some 1:1 inverted sugar solution to feed the bees. The last week or so has been really mixed weather, but mostly rain. When it's raining outside the bees won't fly, so they need to rely on stored nectar during that period. Adding my frame feeder of syrup will help them cope during raining days so they aren't using up all the stores they've been previously saving up. Feeding bees also helps them draw out comb faster because the extra resources allow them to focus on other things than just feeding brood.

I made up my batch of feed using 5 pints of water with 5 pounds of sugar. I brought the water to a boil and then slowly added the sugar. Once dissolved I brought the solution back to a boil, added 3 tablespoons of vinegar and then boiled it for 20 minutes before letting it cool. The boiling process and added vinegar help break down the sugar into fructose and glucose, the idea being that it's easier for the bees to digest. While bees naturally have an enzyme that breaks sugar into fructose and glucose, it's thought that this allows them to use more syrup in a shorter time. There are many differing opinions on feeding bees, and I decided to give this a try first. In future I may just dissolve sugar in hot tap water to save both time and energy. I will need to purchase a food scale though because trying to weigh out 5 pounds of sugar while holding a pot on our bathroom scale was too time consuming. I didn't really document this process, but I will need to make up another batch for when I go out for the next inspection. I'll make sure to take some pictures then.

Once I got the solution made up it was just a matter of transferring it into the frame feeder and installing it into the hive. Unfortunately our camera battery died during the hive manipulation so I only have pictures of me filling the frame. When I go out to check on the hive in 2 weeks I'll get some picture of what it looks like installed.

Filling the feeder frame with 1:1 Syrup.


The feeder frame is hollow. It takes a spot of a normal frame in a super. The white plastic mesh helps the bees get to the syrup without drowning.


My wife took this thinking the white corner was the weird comb, however this is what a good frame should look like. All the white area is capped honey and the middle of the frame is where the brood is raised.

July 19, 2010

Honey Bees

Most people aren't able to recognize a honey bee when they see one. They are wrongly associated with both bumblebees and wasps. Honey bees are much smaller and have a body more like that of a large fly. The reason why people aren't familiar with honey bees is because they are not scavengers like wasps so unless you are an avid gardener with lots of pollinator friendly flowers, you will not commonly see them around your patio.


Name: Honey Bee - Apis Mellifera
Size: 1.0 - 1.5cm
Colour: Pastel Yellow, Brown, Black
Nesting Sites: tree hollows, large man made hollows
Nesting Material: Wax Comb
Colony Size: 10,000-80,000
Food: Pollen, Nectar
Stinger: Barbed, can only sting once

Unlike wasps and bumblebees, a honey bee colony will survive through winter by forming a very tight cluster and vibrating for warmth. The population will gradually decline through winter, but when spring arrives and the weather improves the colony will immediately begin foraging and starting to raise brood. Once there is sufficient nectar and pollen available the queen will start laying more eggs, a productive queen can lay anywhere from 1200-2000 eggs a day. These eggs take around three weeks to become new nurse bees. Once a nurse bee hatches she immediately gets to work feeding young larva and eventually she will graduate into a guard bee protecting the hive entrance. She will then start taking orientation flights and will soon become a forager until she dies. Honey bees work very hard during their life and will only survive 6 weeks, they are literally worked to death. During the summer the colony will work hard to produce enough stores to survive the winter. Depending on the climate a colony will need anywhere from 30lbs to 60lbs of honey to survive, they use this honey as energy to generate heat by vibrating their flight muscles. A honey bee queen can survive many winters, living up to 5 years, but eventually she will start running out of sperm to fertilize eggs. Since all workers are female that hatch from fertilized eggs, they will sense the old queen is failing and start making a new queen. Unfertilized eggs hatch into male drones that do no hive work while draining hive resources and only exist to mate. While the life of a drone may seem glamorous, they die in the mating process and any drones left in the hive before winter will be forced from the hive by the workers to freeze/starve to death.

Honey bee colonies reproduce in what is known as a swarm. Most people hear swarm and they immediately think of an angry mass of attacking bees and this could be the furthest from the truth. There are many reasons that hive can swarm, but the most common is that the hive population has grown to large for the space it is in. The bees will recognize this and start making a new queen. When she hatches she will take over the duties of the old queen who will leave with a large portion of the bees to find a new nest location. While at first glance a swarm can be unnerving with thousands of bees flying around and forming a large hanging cluster, they are actually very docile. Because honey bees die when they sting they are very reluctant to do so. They will only ever sting to defend their brood or if their own person life is in danger. Since a swarm has no hive to defend they are not in the mind set to sting, also because they have stuffed their bellies full of honey for the journey it makes it very difficult for them to physically bend their bodies to sting.

There are many species of honey bees with different positive and negative beekeeping traits. They all slightly differ in colour and the most common are seen below:

Carniolan, Apis Mellifera Carnica


Italian, Apis Mellifera Ligustica


Caucasian, Apis Mellifera Caucasa


German Black, Apis Mellifera Mellifera


Maybe the most infamous of honey bee species is Apis Mellifera Scutellata or as the media have dubbed it the "Killer honey bee". The africanized honey bee does not differ in any way from the regular European honey bee, but it does defend it's hive in a more vigorous manner. They are very territorial and will chase any intruders to their territorial boundary. While being labelled as killers these bees are still manageable and are kept by beekeepers in southern climates. Originating from a warmer climate in South America, africanized bees have migrated as far north as Southern California but cannot survive the cooler winters of northern states.