June 27, 2011

Calgary Tale; Part 2

Greetings readers,

So you've recently learned about how it easy it would be to setup at hive in the city of Calgary. I wanted to do a little bit of follow up because I can't believe how well the bees are doing down there. I was down this past weekend visiting and had the pleasure of simply lounging around on the deck watching and listening to bees come and go from the hive and various plants around the garden. Right next the deck were some Allium giganteum and the bees were all over it. It's indescribably relaxing just sitting in the sun and listening to the sporadic humming as each bee goes from flower to flower.

The other fun activity to do was to sit and watch the dozens of bees going to and fro the watering hole that has been setup on the deck near the hive. It consists of a terracotta saucer filled with specially selected geologically pertinent rocks, both my in-laws are geologists. I hope the bees realized that's petrified wood they're walking on, it is possible to spoil bees?

With my Dad having done his last inspection 2 weeks earlier I had the pleasure of having a quick look to see how things were progressing, and I must say things are going gang busters! Here is a before and after shot of the same top bar during a span of 2 weeks. My dad might have to start engineering a way to install a second hive on top of this one if they keep growing at this rate.

Before: Taken June 12th, 2011.


After: Taken June 25th, 2011

On a completely unrelated note I wanted to post this awesome picture I took of the most marvelous creature I have seen in our garden to date, not including my bees of course. I took this last week, on the 21st, when I noticed something hovering around the back fence. I couldn't quite figure out what it was because it was too small to be a bird but too large to be a bumblebee. As soon as I noticed it had landed on my Delphiniums, I ran to grab to the camera. Here's what I saw!

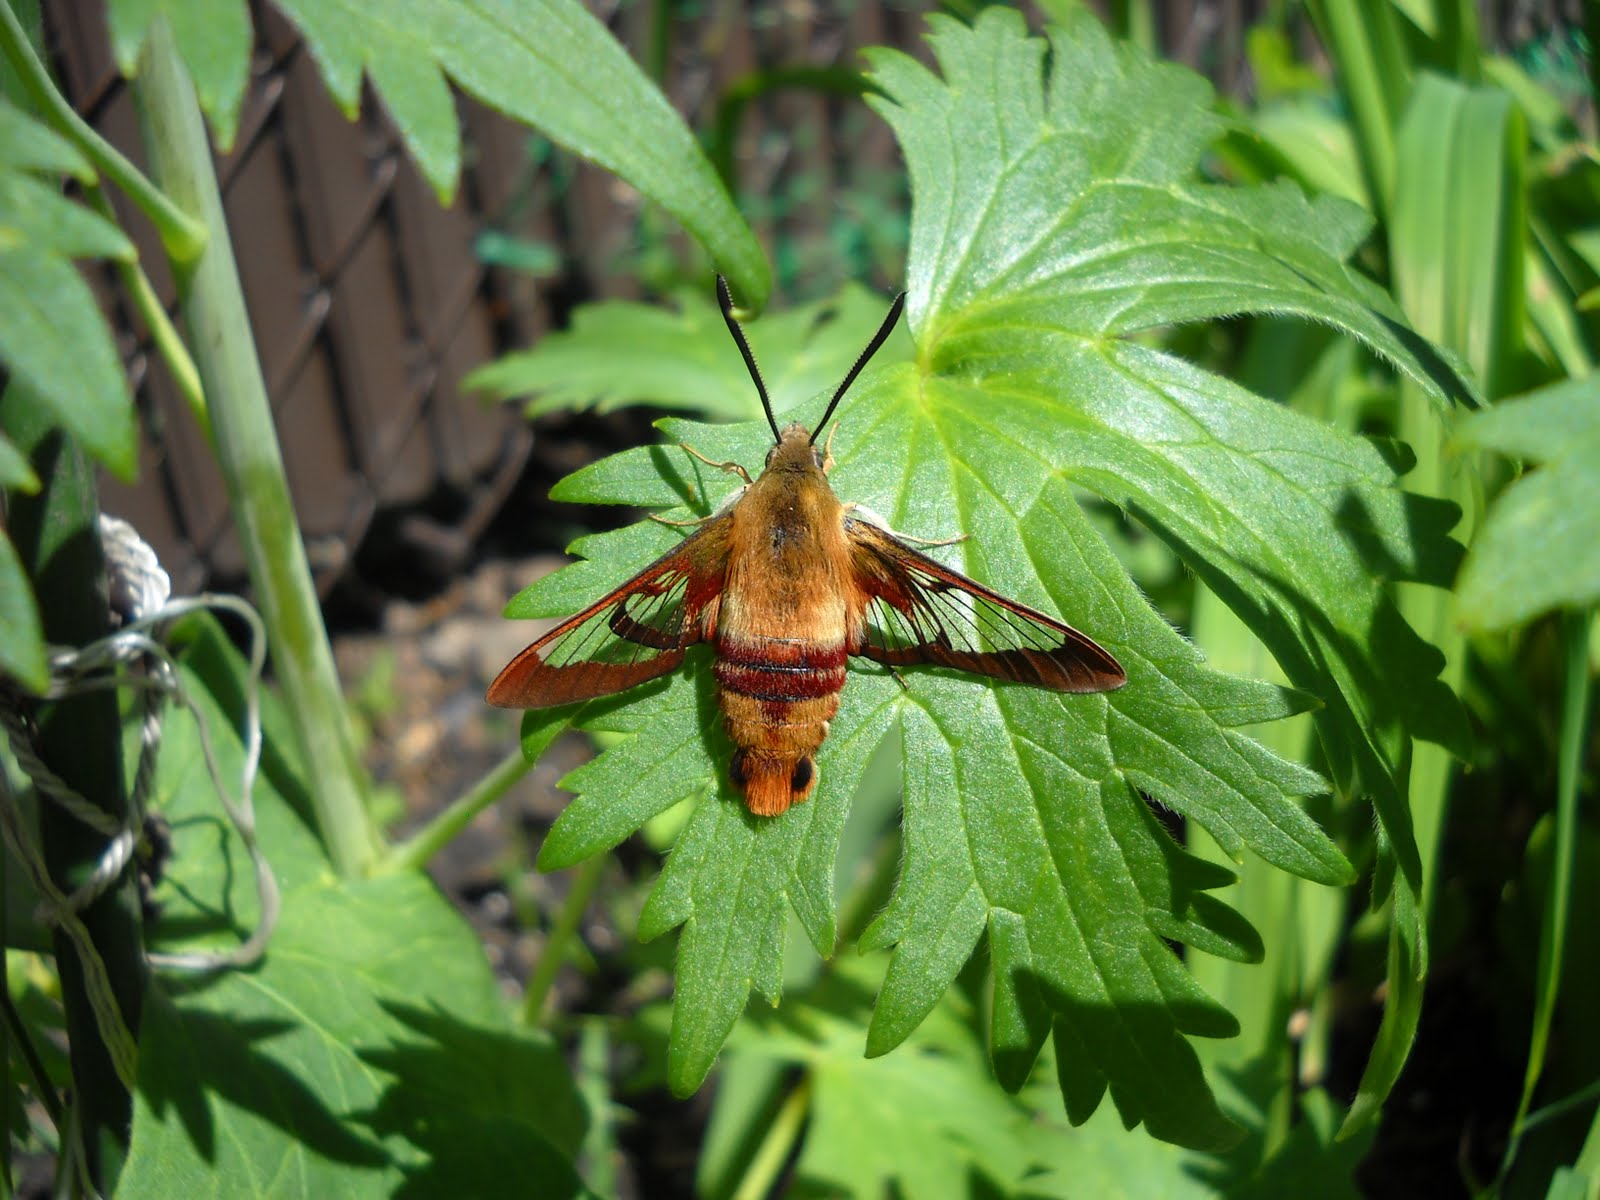
After a little research I found this to be a Hemaris thysbe, Hummingbird Clearwing moth. It is called that because it will hover in front of flowers to feed like a hummingbird and due to its very large size can be easily mistaken as such.

Isn't nature cool! Queue SONG!

June 23, 2011

Tales from Calgary

Hey Everyone,

As I promised a few weeks ago there was a second tale of Top bar beekeeping I had to tell. Again, I got bogged down in other things and have finally gotten around to rounding up all the pictures of my adventure.

It started in February when I went down to Red Deer to meet up with Eliese Watson. Eliese is the founder of Apiaries and Bees for Communities, A.B.C., down in Calgary. For the past couple of years she has been working non-stop to promote pollinators of all kinds but her hardest work has been growing the urban beekeeping scene in Calgary like nobody's business. I had learnt that she was planning a Co-op purchase of nucs from a local source, Bill Stagg, out of B.C. and I was thrilled at the idea of getting my hands on some locally raised bees and queens so I eagerly signed up.

During this time my father was showing quite a lot of interest in beekeeping. He grew up in the prairies on the farm so it wasn't anything unfamiliar to him. When I posed the question as to if he wanted to keep the Nuc I ordered down in Calgary in their backyard he was on it like white on rice. Due to his connections with friends that have wood working shops my Dad was able to build his entire top bar in a weekend, goes to show what having the right tools will do for you, it took Beatrice and I 2 weeks to build ours. As the pick-up date grew nearer though, my mother was growing more anxious about all the perceived issues and problems of backyard beekeeping. In the end, she would have nothing of it and I started my search for an alternative location within Calgary so that my Dad could continue on and enjoy the beekeeping experience. The help came from none other than my own Mother-in-law, she is an avid gardener and had no qualms with the bees...as long as she didn't receive too many complaints and only if my Dad did all the work.

Dad's hive, right next to the house.

The weekend of the Nuc pickup was quite the spectacle. Eliese, who had obviously been working like a bee, had around 100 people show up to pick up their bees and learn about how to hive them. Men, women and children of all ages were there in veils and bee suits, Calgary is definitely headed in the right direction. The weather however had different plans for that week. After we put the bees in the backyard it proceeded to rain and be miserable for a week. Eventually the sun broke through and my Dad was able to put the bees into the hive. Since then he and my mother-in-law have been avid beekeepers, doing their inspections and observing the hive. From all the emails and pictures they send it's quite obvious that the hive is doing very well. I am still a bit envious that I cannot have a top bar in my backyard without risking another call from my loony neighbour, but I think maybe after all our landscaping is done I might sneak one in next year and let the chips fall where they may.

Great looking comb.

Can you see the queen?

June 13, 2011

HAPPY ANNIVERSARY!

That's right folks, today marks 1 year of Edmonton's NewBees! It's been so much fun teaching and talking to all my friends about beekeeping here in Edmonton, and everyone is so supportive and inquisitive.

Things have been busy and things have been dormant, like bees during winter, but there always seems to be new things to share. Thanks for sticking it out during those long winter months without any posts. Here's hoping for another year of great beekeeping info.

In celebration of this milestone, I've gone out and picked up a new URL for the site. You can now access the site by using www.newbees.ca If they ever make beekeeping legal in Edmonton this will eventually be transformed into a urban beekeeping website so that everyone who needs info or courses can find that information!

June 7, 2011

Apologies and Top Bars

Hey Everyone,

I'd like to start off this post with a sincere apology to those readers who contacted me via newbees@telus.net. I honestly forgot about this account as I had only received a few emails from friends and a tonne of spam. While puttering around today I remembered to check it and had half a dozen emails from readers dating back to January. I will be more vigilant in checking in the future!

Now onto the good stuff. Top Bars! I know you are all thinking, "Finally! He's been muttering and carrying on about these for months." Yes, I have and now have the tale of 2 top bar hives.

The first tale is one you are already familiar with. My friend Beatrice and I have been building a set of top bar hives together starting back in April. I decided to spare everyone a giant photo montage of the building process as there are hundreds already out there on the web. I thought I'd focus more on the nuances and differences between Langstroth hives in future posts. As for the building process, it took Beatrice an I about a week and a half to build our hives. We didn't quite have a great woodworking shop and were using whatever tools we could find, we did eventually get the job done though. Beatrice's package arrived May 4th at Bee Maid, and we headed out with her hive and everything else we needed to hive the package. The bees came in a cardboard tube with plastic ventilation caps, which is different then the screened box you see in most YouTube videos. I do think this makes for a much easier installation process.
If you have children, be sure to save it. Its heavy duty construction would make it the Excalibur of any cardboard tube sword fight.

We arrived at the acreage, within the city limits, and got the top bar hive setup. Once we have everything arranged properly we unleashed the bees. This process was extremely simple. First, using a spray bottle filled with a 1:1 sugar syrup you give the bees a good spray down on the end of the tube you are going to open. This will limit the amount of bees that will fly once you pop the top. After they are sufficiently covered in sugar water, you remove the staples holding the plastic cap using a screw driver. You want to do this at the end that has the green mesh hanging out, because this is what the queen cage is attached to. Then, making sure you have a hold of the green mesh, you give the tube a sharp tap on the ground to get all the bees at the bottom, remove the cap and slowly pull out the queen cage. Once you have taken that out and have placed it on the hive, you can turn the tube upside down over the hive and give it a good shake. All of the bees will come out as a clump and then you can lay the tube with the open end facing the hive in front of the hive, any bees that are still inside will find their new home eventually. The last step is to remove the cork from the queen cage and hang it from the middle top bar. If there is no candy in the queen cage, you can easily make up a soft fondant using icing sugar and water, or if you don't want to do that you can come back 2-3 days later and release her manually.

Overall it was a super easy process and the bees loved their new home. Beatrice's most recent inspection last week has shown that the bees have already drawn out 6 full bars of comb and are still building. As a side note, you will always want to provide a feeder for bees coming out of a package. They don't have any food stores and if the weather is lousy or there is a lack of forage they will need it to start building some comb.
Such a nice colour!

The queen cage is suspended in the middle, the happy bees below are fanning pheromones letting the other bees know to come on in.

The second tale I have is about my nuc that I had ordered from Eliese down at ABC in Calgary, however there's a twist! Come back in the next few days and you'll hear about my adventures down in Calgary.